Take command of the airway
Table of Contents
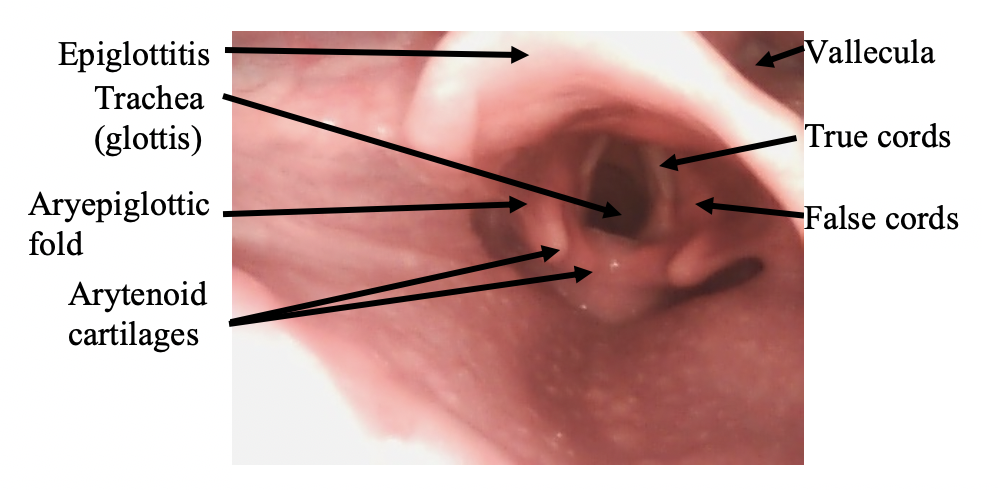
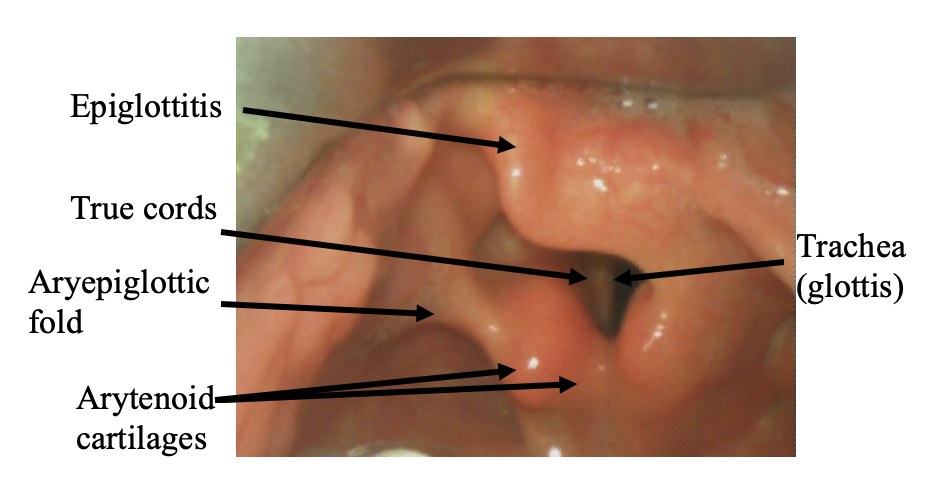
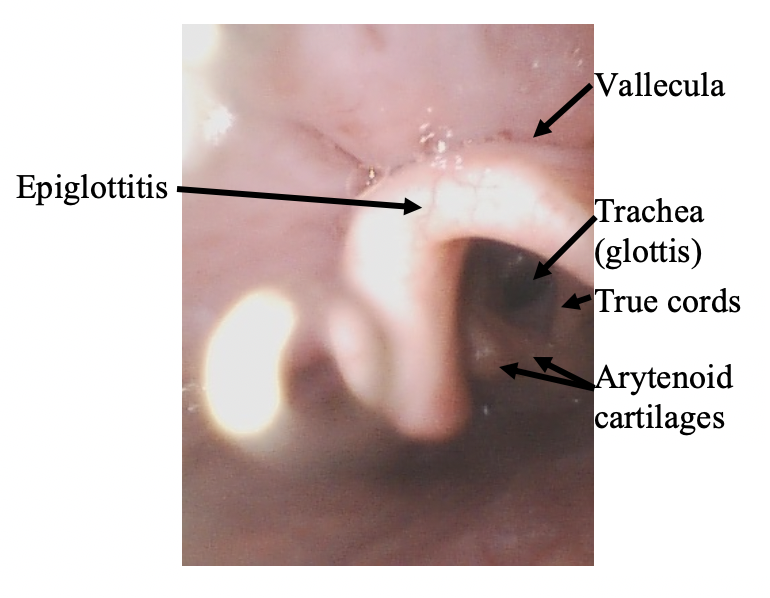
Relevant Anatomy
Welcome back! You did take the quiz right? Good. Then let’s start with the anatomy. The average time it takes for a typical endotracheal intubation is ~20 seconds, so you should be able to identify the anatomy quickly.
Can you confidently name everything in this video in less than 20 seconds?
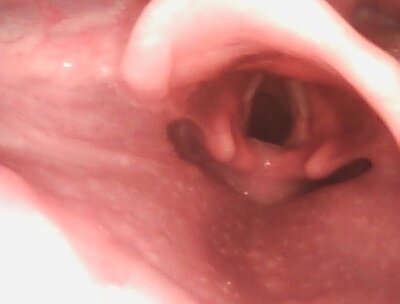
Can you correctly name the 7 major structures?

Now let’s see if you can identify the structures in <20 seconds again. Scroll back to the top and try again. We’ll be here when you get back we promise.
RSI Overview
RSI is the quick administration of sedative and paralytic to achieve fast endotracheal intubation. Very rarely, the patient is so obtunded or unresponsive a sedative and/or paralytic might not be needed, but these are rare exceptions and we will not focus on these in this course. For more information, check out our podcast on Paralytics & RSI:
Maximize chances of success on first attempt. Minimize time till endotracheal intubation due to risks of respiratory failure and loss of airway protection. We assume the stomach has contents so we want to avoid aspiration from prolonged bag-valve mask (BVM) ventilation.
Risks of aspiration, hypotension, esophageal intubation increase with number of attempts (15% to 50% increase in adverse events!).
All are relative. Most important relative contraindication is difficult airway anticipation, of which rescue oxygenation is considered to be impossible or hard to achieve.
If an anatomically difficult airway is anticipated, potential for rapid desaturation, or severe hemodynamic compromise, awake intubation might be needed. This guide will not cover details of awake intubation or intubation via fiberoptic.
You can check out our awesome, 2-page guide on RSI where we cover the entire mnemonic above here.
“ABC” is never 100% the correct order. Sometimes it needs to be BAC or CAB. Some examples:
- Patient is apneic and unresponsive. This patient needs a definitive airway immediately = ABC
- Patient is in V tach and unresponsive. Still breathing spontaneously = CAB
- Patient is not responding and has no breath sounds on right side and is hypotensive = BAC
- Patient was in a trauma and BP is 90/50 systolic = CAB
You can check out our awesome, 2-page guide on RSI where we cover the entire mnemonic above here. Focusing on the “Preoxygenate” portion of that mnemonic, let’s highlight some key points.
If the clinical situation allows, patients should be oxygenated on some form of high flow rate for at least 3 minutes. Preoxygenation replaces the mixed gas concentration in the base of the lung with oxygen-rich gas for optimal FRC reservoir. During apnea, a typical 70 kg adult can maintain O2 saturation >90% for 8 minutes. Children, ~4 minutes. Obese adults, ~3 minutes.

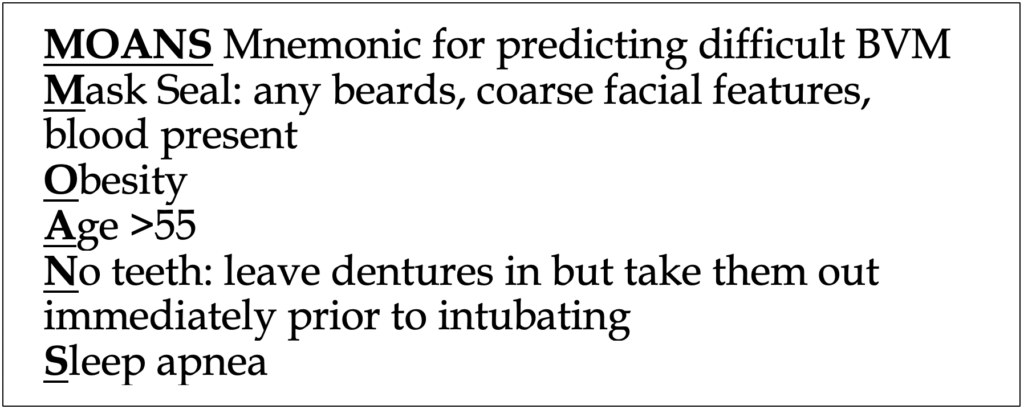
The mnemonic to the left, “MOANS” is utilized to assess whether a patient will be difficult to ventilate and oxygenate via BVM. This is critical as poor BVM technique can inadequately preoxygenate patients. Additionally, solid BVM skills are absolutely critical in general. It might sound harsh, but we believe if you can’t properly BVM, you shouldn’t be allowed to intubate patients.
The mnemonic to the left is absolutely tested on boards. Learn it, use it.
Tools of the Trade
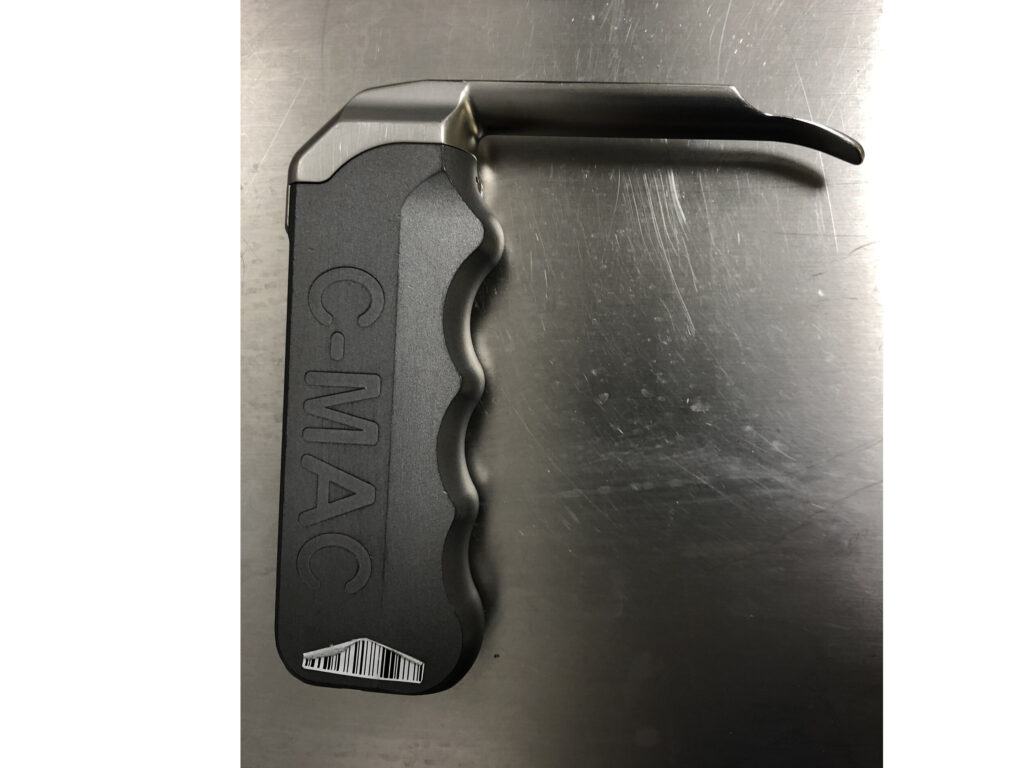
Video laryngoscope blades vary in design and style based on the company that makes them. In simplest form, they are basically Miller or Mac blades with a camera on them. Hyperangulated blades are also common, and they have a greater angulation to allow the vocal cords to come into better view.
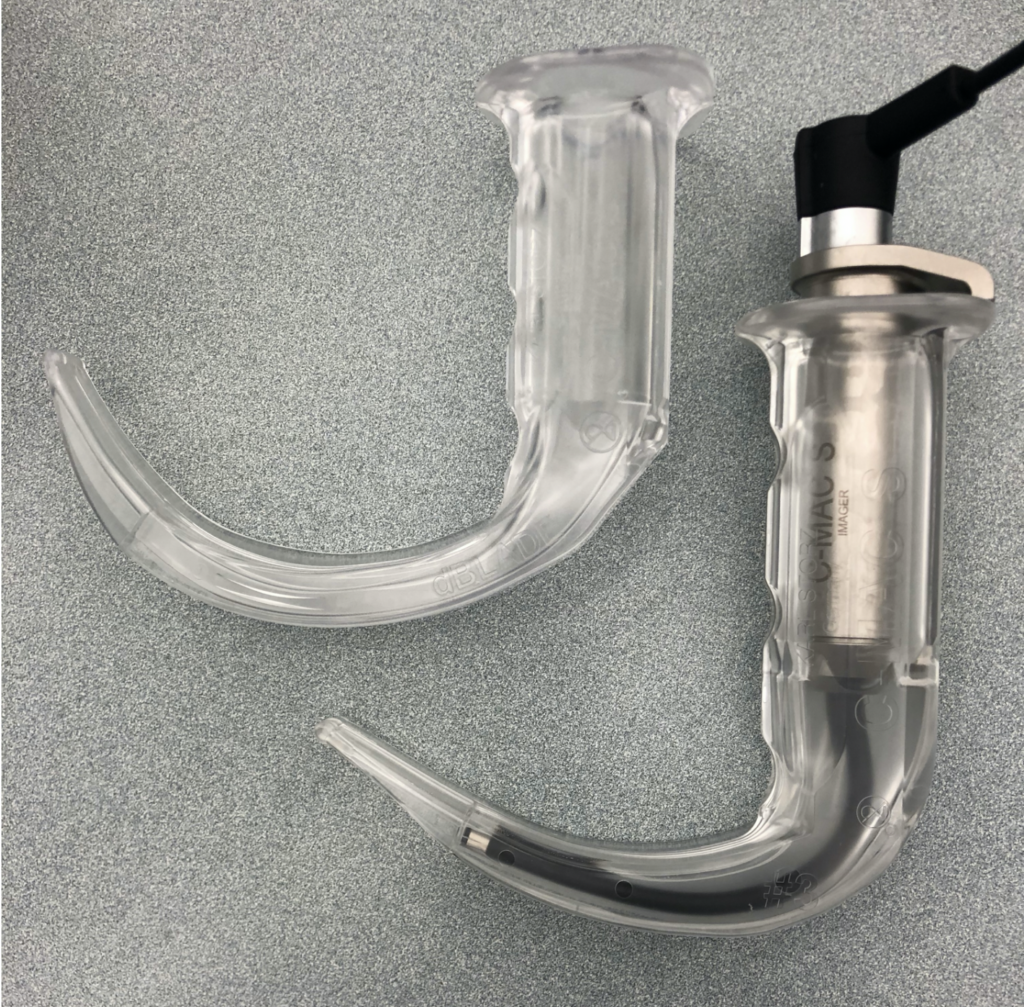
Companies that make VL variants of the Miller and Mac 3 & 4 blades provide an added advantage: direct visualization of the glottis is usually the same, meaning you can switch between DL and VL. To the right is an example of a VL Miller blade made by Karl Storz©.
Some companies have developed blades that should be exclusively used for VL in the event that a difficult airway is suspected and there might be limited direct glottic viewing. These are called hyperangulated blades (more on that below).
Again, you can check out our awesome, 2-page guide on RSI where we cover the entire 6 P’s mnemonic above here.
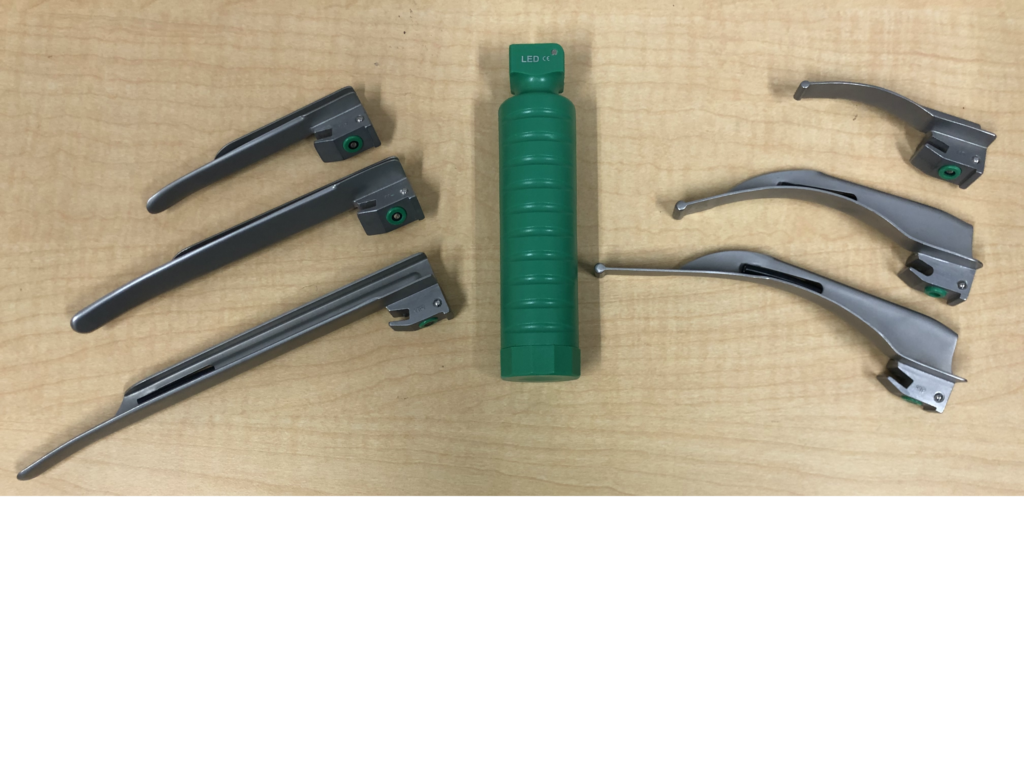
Now, let’s focus on the “Prepare” part of this mnemonic. Time to talk equipment: Laryngoscope blades, suction, oxygen, bougie, and stylet.
Laryngoscope blades can be used for direct (DL) and video (VL) viewing. VL has been found by multiple studies to be superior in first time success rates compared to DL. More recent studies have established VL superior in terms of first-pass success, and many have claimed it should completely replace DL. We tend to agree, but believe practicing DL is still an important skill of any airway proceduralist.
Who wins? DL vs VL
DL Pros
- Very portable
- Inexpensive
- Less moving parts and potential for equipment failure: no video/technical malfunctions
DL Cons
- Significantly higher failure rate than VL
- In some patients DL is nearly impossible due to specific difficult airways
VL Pros
Less fine motor skills are required
Preferred technique in patients with limited mouth opening (trauma, C-spine, facial fractures)
Allows other providers to watch the viewing screen and offer assistance and teaching
Overall higher success rate than DL
Useful for awake and fiberoptic intubations
VL Cons
Passage of tube may be difficult despite good view due to extreme angle of certain blades
Fogging and secretions blocking the camera are a common concern
Loss of depth perception can occur as eyes are on the video
Potential for equipment failure
May lead to decreased DL skills over time
In general, for most adult patients, a DL or VL Mac 3 or 4 will easily intubate anyone. The majority of patients have airways that are classified as “not difficult”, however we cannot understate how critical it is to be proficient in both methods of intubation.
We wholeheartedly believe that providers should regularly practice DL to maintain their airway skills. You never know when DL might be the only option to intubate someone.
That being said, when should you reach for DL over VL? Almost never. DL should be reserved for situations where VL is unavailable or not functional.
There is no “one size fits all”. Using a Mac 3 all the time will eventually burn you when you have someone with a longer airway and your blade does not reach the vallecula. A short blade will impinge on the mid-portion of the tongue, potentially obscuring landmarks. Using a Mac 4 all the time will be an issue once you insert too deeply and miss the airway anatomy all together or the blade is simply too unruly to handle and can displace the epiglottis posteriorly over the glottic opening.
There are lots of ways to do this but we estimate the blade length needed to intubate by putting the blade next to the patient’s face. the blade should reach between the lips and the angle of the mandible. This works well in pediatrics as well.
Hyperangulated Video Blades
These video blades have excessive curvature, and should not be routinely used. They add significant steps and challenges to tube delivery, and preclude DL.
Hyperangulated blades are helpful when good visualization of the larynx cannot occur with standard blades.
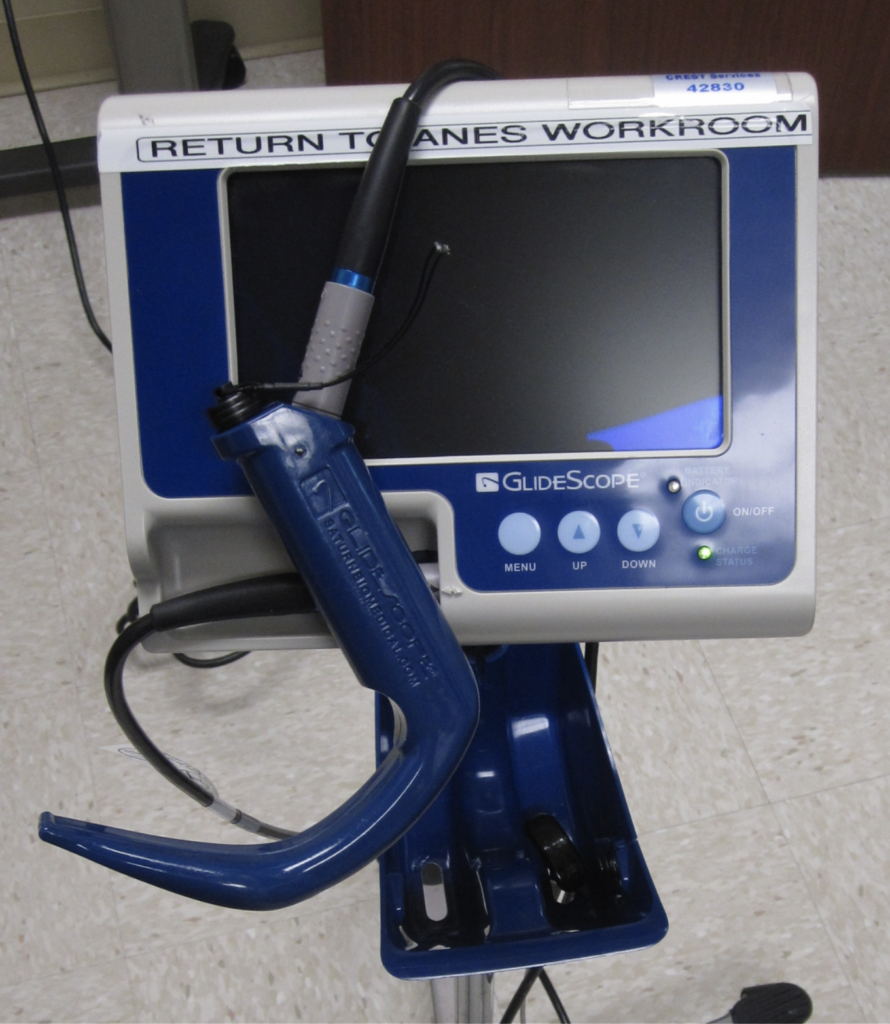
GlideScope© is a competitor that offers a different design. Their hyperangulated VL blade looks like a fish hook with its 60-degree curvature. Its pictured to the left with its associated video screen on wheels. The hyperangulated curve often necessitates the use of a rigid stylet (GlideRite© stylet) to help direct the endotracheal tube into the glottic opening. Direct view of the glottis is typically not possible and not attempted with using this device.
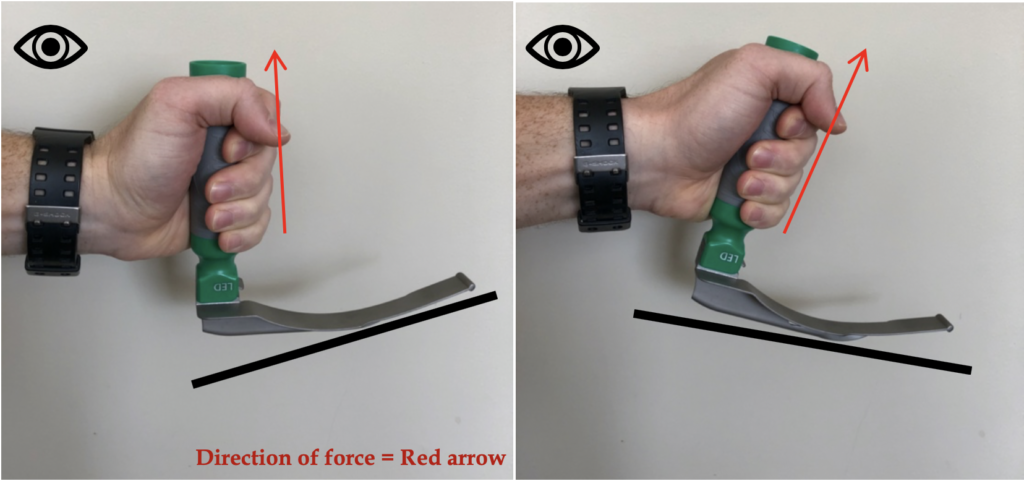
Here we see the blade being placed into the optimal position prior to “the final lift”. Posture is just as critical as inserting the blade properly. We know the provider is not moving their wrist because we have a great view of the glottis.
The provider should keep a straight back, arms at side, and the majority of the work of lifting upward and forward (“up, up, and away”) from the patient should be done with the shoulder. As you lift, aim the laryngoscope handle base toward the corner of where the ceiling meets the wall in front of you.
No wrist, no elbow! Do not rotate the wrist, do not lift the elbows outward from your body. Bending the wrists worsens your view and it can damage teeth.
Do not crouch down closer to the body. Stooping close to the face exposes the provider to oral secretions and vomitus. It also limits the view if DL is being performed. If VL is being performed there is no point in standing close as you are looking at a video screen. If there is difficulty in having the glottis come into view, you can use your right hand to place it on the occiput and extend the neck further to align the axes. The use of your right hand is important to optimize glottic viewing, and can be used for other measures such as tilting the head left or right, or providing external laryngeal manipulation.
Is there any role for BURP (backward-upward-rightward pressure)? It has not been shown to improve first pass success rate and actually might worsen glottic viewing. It is utilized when none or very little of the glottis is visualized, despite appropriate positioning and blade size. It involves the operator or assistant applying “BURP” pressure on the thyroid cartilage.
Data in pediatrics is limited, but multiple adult studies have not been kind. In fact, one study showed visualization worsened in 30% of cases!
Direct cricoid pressure is not advised in children.
External laryngeal manipulation (ELM) is performed by the operator in an attempt to improve visualization. This differs from BURP in that the operator manipulates the larynx in varying positions, coordinating with what it is being simultaneously visualized. This allows for fine tuning to maximize laryngeal exposure.
We believe ELM is more beneficial than BURP.
Another good demonstration below.
How about this case?
0:03-0:10: The tongue was not properly swept to the left. Notice how the physician inserts the blade once, notices the tongue is in the way, and tries to withdraw and reinsert to sweep the tongue but still fails to properly move it out of the way.
0:10-0:14: The blade is not properly placed in the vallecula. The blade is present in the vallecula, but not optimally. It seems to be more lateral. Sweeping the tongue away would have greatly assisted with blade placement.
0:15-0:17: Good suctioning.
0:20-0:40: The glottis is incompletely visualized for tube placement. Notice how the physician struggles placing the ETT for nearly 20 seconds, all the while unable to see what’s underneath the epiglottis. The axes were likely not properly aligned, and we are unsure if enough “lift” was being generated.
Yet again another video of suboptimal blade placement. Just like before, the physician successfully intubates the patient, but in both these cases the patient has an “easy” airway. We are pointing out these small mistakes because in a patient with a difficult airway, these small differences in technique can easily mean the difference between life and death.
0:08-0:10: suctioning wouldn’t be a bad idea here to highlight anatomic structures.
0:11-0:24: the epiglottis is blocking part of the glottic opening. The blade is inserted too deep and the provider is likely not performing much “lift” of the head. The neck could probably be extended more too. You can see the physician struggles at first to position the tube. The blade could partially be withdrawn as well as the epiglottis seems to be “snagged”. Finally, the tube seems to hit the right angle and go in.
0:02-0:06: again, the tongue could be arguably swept to the side more, making for easier entry.
0:08-0:13: The blade seems to be insert too deeply, and the axes are not properly aligned to reveal the glottis.
0:14-0:16: the blade is inserted too deeply and flips over the epiglottis. This would not allow for a proper intubation. A curved blade should never be used to position the epiglottis posteriorly (that’s what a Miller blade does). In doing this, the user might snag the ETT on the arytenoids. Using the D-blade as a Miller blade may cause the cords to fall into a more anterior position that can cause the snagging.
0:18-0:26: good view is restored and tube placed without issue.
Next is a difficult intubation on a trauma patient who arrives unresponsive after an MVC. You must approach airways in trauma patients with the assumption they will be difficult. For starters, in blunt trauma patients with GCS <8, cervical spine injuries were found in 10% of patients. C-spine stabilization must be maintained with little manipulation as possible.
VL is the preferred method as it is less likely to manipulate the neck. An obvious downside is less manipulation of the neck, meaning improper glottic viewing. Another issue with trauma patients is obvious: trauma to the neck and face +/- bloody secretions distort anatomy and blur the VL camera.
0:02- good scissor technique. We see at the very beginning a second provider holding C-spine stability, the hallmark of trauma intubations. 0:08- tongue could be swept more.
0:12-0:30 we are greeted by a hail of secretions and blood. Landmarks are impossible to identify.
0:41: suctioning is finally performed after 30 seconds of wandering around with the blade. More suctioning is needed.
1:00: glottis comes into view. The arytenoids appear swollen. The curved VL blade is not in the correct position and should be anterior to the epiglottis. We talked about the implications of this misplacement above and its quite apparent here. The ETT is snagging on the arytenoids. Using the D-blade as a Miller blade may cause the cords to fall into a more anterior position that can cause the snagging.
1:04-1:50: We watch the physician with great difficulty attempt to place the ETT. Clearly its snagging on the arytenoids. The camera is blurred around 1:23, one of the greatest weaknesses of VL. The provider eventually intubates around 1:50, and the view is still very poor. Unsure if the provider switched to DL to get a different view.
Speaking of difficult airways, let’s talk about our favorite airway device…
In this video we see the use of the erroneously named “gum-elastic” bougie, an airway assist device designed for difficult airways. It is not made of gum or elastic.
Measuring 10-15F and 60 cm in length, its slender, long, flexible design allows for insertion of ETT using the Seldinger technique. It functions as an “introducer”, where the device is inserted into the airway first, and the ETT is inserted over it (railroaded). The bougie is subsequently removed after successful ETT placement. The Bougie tip is angled 30 degrees, allowing it to “ramp up” over the arytenoids into the glottis. The tip should always point anteriorly. The bougie excels best in “very anterior” airways, as well as ETT or catheter exchanges. The bougie is flexible and can be bent to conform into a different shape.
The bougie should be held like throwing a dart, using the thumb, forefinger, and middle finger to grip about 20 cm from the forward tip. It should enter from the side of the mouth to allow for proper manipulation at the glottis.
0:12: we see the curved blade pinning down the epiglottis, which we’ve seen before. This is incorrect placement and you should know why by now.
0:13-0:27: several times we see failed ETT placement until the blade is withdrawn for repositioning.
0:40: proper curved blade placement.
0:50: Bougie inserted correctly. ETT is railroaded over it properly.
Pediatric airways
Now comes a pediatric airway. Before we delve into some rough cases, let’s review some items. Children have many differences in airway anatomy that requires our attention.
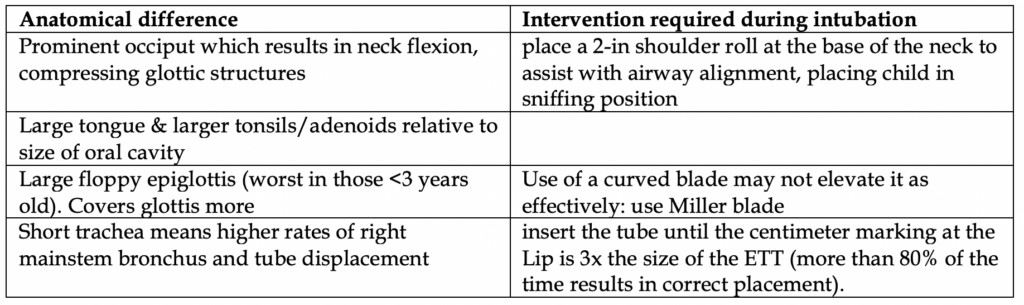
The sniffing position is a necessary standard for a successful pediatric intubation. More often than not, placement of a shoulder roll at the base of the neck and a head rest elevating the occiput of the head are necessary.
Critically, the glabella and the chin should be horizontally aligned, with the anterior neck space completely exposed. The external auditory meatus should be horizontally aligned with the suprasternal notch.
The other difficult aspect of pediatric airways is the limited chances to practice: studies have repeatedly shown that success increases by level of training. One study showed peds EM attendings had 89% success, fellows 43%, peds residents 35%. Even anesthesia residents have <50% success rate after 10 intubations. After >55 cases they averaged 90% success.
0:00: we see before even entering the airway the camera is blurred. The physician should check camera function prior to usage.
0:15: the airway has heavy secretions. Suctioning is badly needed. Landmarks hard to identify.
0:30: around the 30 second mark we see swollen arytenoids and the glottis. The Miller blade is properly positioned posterior to the epiglottis, pinning it down.
0:37-0:50: the provider struggles to place the ETT.
0:52- end: VL camera becomes blurred. Unsure if it was a successful intubation.
In the video above you probably saw a cuffed tube being used. Only recently have we stopped using uncuffed tubes in the vast majority of cases. Traditionally there was concern that cuffed tubes would cause pressure-induced ischemic damage to tracheal mucosa.
Cuffed tubes have been found to be safe and effective, are more likely to result in correct tube size placement, and provide better tidal volumes with less leakage. There was no increase in post-extubation complications found.
As with adults, stylets should always be used.
A commonly used formula is (Age/4) + 3.5 = cuffed tube size
Endotracheal tube sizing is based on the age of a child except for neonates. Tube sizes are weight-based in neonates. For a premature newborn, a 2.5 ETT is recommended because this is the smallest size available. For a baby weighing 1.6 kg to 3 kg or more, a 3.0 ETT is fine. Neonates should be intubated with an un-cuffed tube, all other children should received a cuffed tube.
Insertion of tube at the correct site is important as the trachea is narrow and short in children. There are higher rates of right mainstem bronchial intubations when compared to adults. Also, unintentional head movement can displace the ETT by as much as 1-2 cm in children!
Best tip: insert the ETT until the centimeter marking at the lip is 3x the size of the ETT (more than 80% of the time results in correct placement).
0:00-0:03: immediately we are greeted with the different positioning a Miller blade provides. It is placed posterior to the epiglottis (“pinning it down”). This is because children have large, floppier epiglottises, and if a Mac is used the epiglottis still tends to hang over the glottis and move, restricting tube entry. Interestingly, there is a plastic tube in the esophagus, likely an NG tube.
0:03-0:21: the physician struggles a little with tube placement, likely due to the sharp angle and the glottis being very anterior, a common finding in children. Hyperextending the neck and putting a “shoulder roll” or some object underneath the neck in children can assist with forcing the glottis more into view. A bougie (depending on patient age and available ETT size) could also be utilized, although the smallest size of a bougie only fits inside ETTs greater than 2.0 – 4.0 mm typically, depending what brand. Doubtful there are good bougie sizes at a non-pediatric hospital.
Here is a pediatric intubation during CPR
0:03: almost immediately we see the patient is receiving active CPR due to the shakiness of the camera and the rhythmic motion of oral secretions.
0:03-0:11: suctioning would have better optimized view. almost immediately the miller blade is not positioned properly. It is anterior to the epiglottis when it should be covering it. The blade appears far away from the epiglottis. We have no view of the cords.
0:12-0:16: the ETT is inserted and it’s a very poor view. We have no idea if the tube was inserted correctly but we have major doubts. That was not a confidant intubation.
In general, studies have shown endotracheal intubation in adults need not be attempted if CPR is halted or if there is no experienced airway provider. We fully support waiting to intubate when ROSC is achieved and utilizing airway adjuncts and superb BVM technique.
In children, the vast majority of causes of arrest are respiratory failure, so intubation during CPR is necessary early on and should be performed by the most experienced provider.
0:03-0:08: again, we see active CPR. The physician actually has a really good view here and should proceed to insert the tube.
0:09-0:15: Sadly the view is lost and the blade slips anterior to the epiglottis. The epiglottis is slippery and hard to pin down at times. Add in the CPR and this makes it much more difficult to hold that view for long. This view again highlights why the Miller blade is preferred for pediatric intubations. Look how the epiglottis overhangs the glottis and prevents a clean, open view.
0:16-0:30: CPR is halted for nearly 15 seconds (too long) to allow for the provider to acquire a view and place the ETT. The provider never properly places the Miller again, and honestly gets lucky with tube placement with an improper technique. It likely would have failed if CPR was ongoing.
There are innumerable airway guides and training modules online. We encourage you to look at others as you develop your skills, or continue to maintain them. Check out our other resources below:
Podcast on Paralytics & RSI: “44. Grade 1 view please- RSI Paralytics”
Comprehensive, kick-ass 2 page handout on RSI here
Conclusion
References
Kumar D, Gombar S, Ahuja V, Malhotra A, Gupta S. GlideScope versus D-blade for tracheal intubation in cervical spine patients: A randomised controlled trial. Indian J Anaesth 2019;63:544-50
Mosier J, Chiu S, Patanwala AE, Sakles JC. A comparison of the GlideScope video laryngoscope to the C-MAC video laryngoscope for intubation in the emergency department. Ann Emerg Med. 2013;61(4):414–420.e1. doi:10.1016/j.annemergmed.2012.11.001
Chan, M., Al-Buali, W., Charyk Stewart, T. et al. Cervical spine injuries and collar complications in severely injured paediatric trauma patients. Spinal Cord 51, 360–364 (2013). https://doi.org/10.1038/sc.2013.6
Baek MS, Han M, Huh JW, Lim CM, Koh Y, Hong SB. Video laryngoscopy versus direct laryngoscopy for first-attempt tracheal intubation in the general ward. Ann Intensive Care. 2018;8(1):83. Published 2018 Aug 13. doi:10.1186/s13613-018-0428-0
Herbstreit F, Fassbender P, Haberl H, Kehren C, Peters J. Learning endotracheal intubation using a novel videolaryngoscope improves intubation skills of medical students. Anesth Analg. 2011 Sep;113(3):586-90. PMID: 21680859. [Free fulltext]
Hurford WE. The video revolution: a new view of laryngoscopy. Respir Care. 2010 Aug;55(8):1036-45. PMID: 20667151. [Free fulltext]
Levitan RM, Heitz JW, Sweeney M, Cooper RM. The complexities of tracheal intubation with direct laryngoscopy and alternative intubation devices. Ann Emerg Med. 2011 Mar;57(3):240-7. PMID: 20674088.
Rosenstock CV, Thøgersen B, Afshari A, Christensen AL, Eriksen C, Gätke MR. Awake fiberoptic or awake video laryngoscopic tracheal intubation in patients with anticipated difficult airway management: a randomized clinical trial. Anesthesiology. 2012 Jun;116(6):1210-6. PMID: 22487805.
Todres ID. Pediatric airway control and ventilation. Ann Emerg Med 1993; 22:440.
RUBEN HM, ELAM JO, RUBEN AM, GREENE DG. Investigation of upper airway problems in resuscitation. 1. Studies of pharyngeal x-rays and performance by laymen. Anesthesiology 1961; 22:271.
Don GW, Kirjavainen T, Broome C, et al. Site and mechanics of spontaneous, sleep-associated obstructive apnea in infants. J Appl Physiol (1985) 2000; 89:2453.
Arens R, McDonough JM, Costarino AT, et al. Magnetic resonance imaging of the upper airway structure of children with obstructive sleep apnea syndrome. Am J Respir Crit Care Med 2001; 164:698.
Westhorpe RN. The position of the larynx in children and its relationship to the ease of intubation. Anaesth Intensive Care 1987; 15:384
John SD, Swischuk LE. Stridor and upper airway obstruction in infants and children. Radiographics 1992; 12:625.
Weiss M, Knirsch W, Kretschmar O, et al. Tracheal tube-tip displacement in children during head-neck movement–a radiological assessment. Br J Anaesth 2006; 96:486.
Kerrey BT, Rinderknecht AS, Geis GL, et al. Rapid sequence intubation for pediatric emergency patients: higher frequency of failed attempts and adverse effects found by video review. Ann Emerg Med 2012; 60:251.
Konrad C, Schüpfer G, Wietlisbach M, Gerber H. Learning manual skills in anesthesiology: Is there a recommended number of cases for anesthetic procedures? Anesth Analg 1998; 86:635.
Fine GF, Borland LM. The future of the cuffed endotracheal tube. Paediatr Anaesth 2004; 14:38.
Kleinman ME, Chameides L, Schexnayder SM, et al. Part 14: pediatric advanced life support: 2010 American Heart Association Guidelines for Cardiopulmonary Resuscitation and Emergency Cardiovascular Care. Circulation 2010; 122:S876.
Chambers NA, Ramgolam A, Sommerfield D, et al. Cuffed vs. uncuffed tracheal tubes in children: a randomised controlled trial comparing leak, tidal volume and complications. Anaesthesia 2018; 73:160.
De Orange FA, Andrade RG, Lemos A, et al. Cuffed versus uncuffed endotracheal tubes for general anaesthesia in children aged eight years and under. Cochrane Database Syst Rev 2017; 11:CD011954.